This is the first segment I cut for for “Iron Chef Eats”; it went through a number of revisions as I learned the grammar of food tv editing but I think it turned out OK, and I like some of the music we used.
Category: Editing
Friday Night Tykes: Big Cory, Little Cory
This is a scene I cut from Friday Night Tykes. It shows some great banter between a kid and his dad, a coach for the Venom. It’s a slice of life, but does a good job of showing how sport can be used to organize and improve lives, without being preachy about it.
Wilhemina’s War: Viv and the Pastor, to Barbershop
This is a section from the middle of “Wilhemina’s War”, festival version. One of the activists we’ve been following goes to chat with a pastor, and then we go to a local barbershop to hear some men talk about how seriously they take HIV/AIDS prevention. We had so much great stuff from the barbershop, I swear there’s another film hiding just in the conversations there. Without spoiling anything, it turns out the men tell us what they think we want to hear when the activists are around, but it’s a different story later on.
As an editor, neither of these scenes felt promising at first, but there was some great stuff hiding in the footage. The scene with the pastor seemed stagey. But the pastor’s reactions are not staged, and really demonstrate the difference between hearing something and understanding it – you see him make that transition.
The barbershop footage seemed like a chaotic mess, and the audio was terrible – there are fans blowing the whole time. But after listening closely, we realized there was something instructive going on amidst the banter and bragging. The audio team at Splash Studios did some amazing work cleaning this up, and the result is a memorable scene that crystalizes the point that no matter what we know, we sometimes still do what we want anyway.
Switching to Premiere, part I
SWITCHING TO PREMIERE PRO CC Part I: MOVING FROM FCP 7.
I recently finished editing a documentary project I worked on over the course of three years. Wilhemina’s War is a story about a family living in rural South Carolina, as they struggle to live healthy lives in the middle of an unacknowledged HIV epidemic. The director, June Cross, had been shooting with the family for almost five years; there was a lot of footage, and there have been a lot of different hands on the project over that time.
The project had been in started FCP 7; I’d used that to edit several projects for this director before, and I had dearly loved working in Final Cut. Even with fairly big projects, I’d been able to read when the system was getting screwy and quit before losing work.
But…as this particular film was being edited for so long, and had so much footage in so many formats, FCP 7 just wasn’t working any more. When I picked the edit up in May 2014 the project file was 202 mb. I normally would try to keep that under 100; even after as much housecleaning as I could do, 132mb was as small as I could get the main project. It gave an “out of memory” error immediately on launch about half the time.
I wrestled with it for a couple of days, trying to make changes and work on the new structure of the film, but I was losing a lot of time due to crashes and the time it took to reload the large project file. It seemed like it was time to move.
WHERE TO GO NOW?
This show had about 250 hours of footage, spread over 6 drives, a total of about 14TB. Most footage had been transcoded to ProRes already, though maybe 20% was DVC Pro or even DV.
I wanted to move the project to FCP X. I’ve done a few short projects with it, and love the keyword based organization. But I couldn’t find anyone else using it for really big projects. I decided to ask a friend of my who runs a local post facility if they’d seen any FCPX projects come through. The answer was yes, and it had been a bit of a nightmare. So, as much as I wanted to brave the waters with FCPX, knowing that the guy who’d probably be doing the finishing work felt it was a bad idea, I moved on to the next candidate: Avid Media Composer.
I haven’t had good experiences editing on Avid with footage that was just AMA’d in – most shows I work on AMA the footage and then transcode to DNxHD – and so I didn’t think it was smart to try to finish the film just using AMA. And I didn’t have the time or drive space to transcode all 15 shoots plus a pile of archive footage. So, though I’ve spent plenty of time on Avid and had no doubts it could handle a project that large, Avid was out.
Which left Premiere.
TAKING THE PLUNGE
I’d read that Premiere could read FCP XMLs, but earlier attempts to move the cut over to PP 6 had given mixed results at best. Adobe had just switched to the “Creative Cloud” system, so Premiere CC was the current version. I logged in, downloaded it, and made a new project. Then, back to FCP…I selected my hour long sequence in FCP, made the new XML, and then imported it into Premiere. It took about 3 minutes. The aspect ratio was off for a handful of clips. But it linked properly to pretty much everything. Many of my titles cards even came across.
I tried to make one XML for all the footage, and FCP kept bailing with one error or another. But simply choosing the folder for one shoot at a time gave good results, and was also very quick.
At this point though, it became obvious I’d made a mistake. I was anxious to see my cut – so I’d imported that first. But when I imported a sequence into a project with no other clips in it, Premiere Pro CC created clips as necessary, sort of like if you’d dragged a FCP sequence from the timeline back to a bin. So my edit sequence was linked to clips that didn’t live in their proper places in the shoot bins. Just to be safe, I made a new project and imported my 15 footage XMLS, and then imported my cut. Premiere still made a few duplicate clips rather than linking to the already imported shots, but I’d say 95% of material linked as expected.
Time to make the switch, and spend the day working in Premiere instead of FCP.
GETTING THINGS DONE…SLOWLY
Getting started, it was immediately obvious how much of a multi-threaded appplication Premiere CC is. After getting all the footage imported, Premiere immediately starts doing like 10 things at once. It generates “peak” files for every clip. It generates a preview for every single clip. None of this takes all that long, unless you dump a giant amount of stuff on the system at once – like I did. You can start working while all this is going on, but things are a little pokey.
Which brings me to the next point. The edit system I was using was a bit of doc maker’s special – for assorted reasons the we’d bought a (non-retina)MacBook Pro 13 inch last year (though the i7 version), which was running 2 external monitors. The computer had 8 gigs of RAM, which was fine for FCP – since it never used that much regardless of what was available – but, apparently, not really enough to run Premiere on a project the size I had. Even after letting the system finish all the previews and assorted background tasks, it was fairly slow on many functions. Like, double clicking a bin to open it might work immediately, might take 2 minutes, or might just hang the system. There were also problems opening the project, which was fairly discouraging. Sometimes it would just hang, requiring a force quit, and relaunch. Premiere would ususally throw up a dialog box saying roughly “It appears Premiere crashed while trying to open windows, do you want to not open windows?” and then the project would open.
So far, this wasn’t feeling a heck of a lot better than FCP 7, except for the fact that there was the hope it could be fixed where FCP was a dead end. We spent $200 for 16 gigs of RAM, and thankfully the next day went substantially better.
In practice, using Premiere is a lot like using FCP 7. You can move clips around in the timeline from the keyboard; raise and lower audio levels from the keyboard, and select trims,ripples, and rolls the same way. I spent a couple of hours one weekend on Lynda.com and that Monday there was very little I didn’t feel I could get done.
A FEW PERKS
Once you get the fingers used to the different keys for zooming in and out of the timeline, there are a lot of nice things that begin to become apparent. Stills animation – the keyframing works just like in After Effects. Very easy to work with. Clips have a basic set of intrinsic effects – scale, position, as with FCP.
Even on that lowly 13 inch MacBook Pro, I didn’t really have to render anything. This was confusing, as there is a bar across the top of the timeline which indicates probable playback performance. On this computer, there was a lot of red. But it turned out it was fine anyway, even with playback resolution set to full. I did turn that down to half as it made things a bit more responsive. But by the end of the first day working with 16 gigs of RAM in the machine, it was clear that moving to Premiere had been a good decision.
There were a few of things that I really liked right away. For instance, there’s a setting called ‘Targeting Presets”. This lets you save a track patch set up. So,if you intend for music to always be on tracks 9 and 10, you can save that track patch, and map it to a keyboard setting. Load a music cue and then it’s just a single click to restore the track layout how you need it to be. Between a patch for broll, one for interviews and one for music, you don’t have to do a lot of manual re-setting track patches.
Another thing I really enjoyed is that Premiere has a fuller support for control surfaces [https://robertsalsbury.com/2012/08/28/hands-on-mixing-with-an-ipad-part-3-avid-lemur/] than Final Cut does. You can rename tracks in your timeline and those names will show up on the control surface, which is neat. And audio levels are sent as well – not the level a fader is set for, but actual audio levels. That makes it easy to look and see which channel has the louder mic, or what channel has some noisey background you want to get rid of.
After about 2 weeks of cutting on that older laptop, I switched to using my own retina MacBook Pro 15 inch, which was the latest model at that point, and had the upgraded video card. This made an huge difference in the responsiveness of the application. It turns out that having a supported video card is a big deal. After that, I can honestly say that the edit system was as responsive as any I’ve ever used.
THAT’S ALL FOR NOW
So that is a little background on moving a project over to Premiere from FCP. I will also be posting about the process of editing as it developed with Premiere, and about finishing Wilhemina’s War for both festival and broadcast versions.
More Audio Faders – Using AC-7 Core XT with FCP 7
It’s been about 18 months since FCP X was released as I write this, and there are many, many, FCP 7 workstations still cranking out shows around New York City. I expect folks will hang on to these systems as long as possible; I’m working on one right now. In an earlier post, I walked through setting up an iPad to control the audio mixer in FCP 7. I’ve grown accustomed to working with an iPad to manipulate audio levels, and frankly miss it if I don’t have access to that. So, to simplify (no, really), I grabbed an iPad 3 last spring, and now work with two iPads on my desk. I can tell you, it never fails to elicit an reaction when someone walks in the room. Sigh. I end up explaining that one is dedicated as an audio control surface, and one is used for whatever normal people use laptops for – email, note taking, reading scripts.
But having two iPads does open up some interesting possibilities, and I remembered that the company that made AC-7 Core also made another app, AC-7 Core XT – which adds another bank of 8 faders to the first 8 provided by AC-7 core. This allows you to have direct access to 16 faders, which is where I generally try to cap my tracks during editing a show. The Core XT app works as advertised and well, however the setup isn’t immediately obvious. So, for posterity, here is how you make that work.
iPhone: Runtime!
There are a few neat little things I’ve run across as I worked this fall and winter that made my life a bit simpler as I navigated the trenches of documentary television. Runtime for iPhone was one of them.

Runtime on the App Store $1.99
Runtime is a great take on that most reliably needed tool, the timecode calculator. Time was, these were hardware, and kind of expensive. Like the blue Portabrace gear the field crew drags everywhere (though apparently the new stuff is black?), post production professionals likely had a FrameMaster from Calculated Industries on the desk somewhere. They were pricey.
Hands on Mixing with an iPad part 3 – Avid & Lemur
iPad and Media Composer: Liine Lemur
Ladies and gentlemen, it is time for an upgrade.
It’s been almost a year that I’ve been editing shows on Media Composer and mixing them using an iPad running MIDI Touch and Touch OSC. These tools have made working with audio on the Avid substantially easier. But there have been some rough edges; the connection would go to sleep sometimes, requiring extra taps to re-start communication between the Avid and iPad. Solos and Mute buttons required double taps to trigger and turn off. And then, the faders themselves were a little fiddly; it was difficult to make small adjustments. And it didn’t look quite as cool as I wanted.
The iPad has been a small revolution for musicians in innumerable ways. From easier access to sheet music, to GarageBand as the new four track,to a recent app that provides a 48 track DAW environment, and not least, the sort of programmable MIDI gear I’ve been using to make theses tools which work with Media Composer. In 2004, the closest equivalent would have been a JazzMutant Lemur, a very cool, very high end device. Daft Punk, Bjork, and many other top acts use these devices live. Completely customizable and programmable, multitouch before most people even knew you could do that, I totally wanted one,for no good reason, and now, that very same software runs on the iPad. The same tech that rocks stadiums, I am using to rock rough cuts that are routinely 10 minutes too long. If you’re interested in more general info about Lemur and the iPad app, here’s a nice writeup.
Using the iPad for video post: Storyist
 In documentary and the reality shows I’ve worked on, everyone uses Microsoft Word for writing. No one loves it, but they use it because the client requires you to deliver the script in a table with cell numbers on each line, to make it easy for the lawyers, I suppose. But the truth is that now there are plenty of writing tools that are designed to be a bit more helpful to a writer than simply being a fancy typewriter. Tools that help you visualize overall story structure, manage research, and work on the writing all at once.

For almost a year, I’ve been using one of these tools on my iPad (and desktop) called Storyist. The other big app in the category is Scrivener, and that’s the one I used first.
Quick update: Using Media Composer iPad controls on the PC
Earlier on this blog I showed you how to setup an iPad to control the audio mixer in Avid Media Composer – at least on a Mac.
I’ve been working on a PC based Avid Media Composer for a little over a month now, running MC 6.0.1. It turns out that setting up the iPad to work with the PC is more complicated than a Mac (surprise!) but not impossible. It just requires some extra software to make all the pipes connect.
By installing rtpMIDI, I was able to make the wireless connection to the workstation.
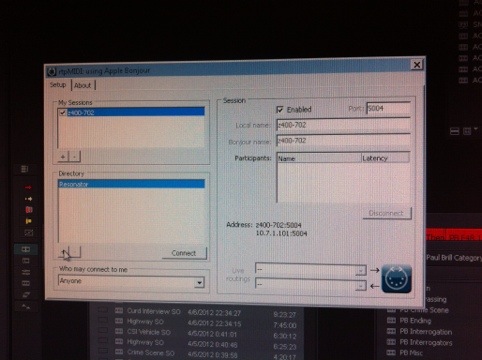
(pardon the actual screen shot)
Actually I also bought a cheap USB WIFI adapter, and each morning, I set up an “ad-hoc” network on the PC, and then have the iPad join up to that. Then, launch rtpMIDI, and launch any MIDI app on the iPad. The iPad then appears in rtpMIDI, and you can connect it. The procedure is exactly the same as on the Mac – on both platforms, you’ll need to create new session the first time you do the setup. This is the box in the upper left corner.
Then, once Composer has launched, you set the gain controller port to whatever you named the session. Use MIDI Touch to send the controller identification to the Avid, and then switch over to TouchOSC to get your faders rolling. It’s just as functional and reliable on the PC as on the Mac.
Finding a Windows replacement for Keyboard Maestro has me stumped a little; this is what I’d used to bridge between non-fader controls on the iPad and the Avid, like play and pause, mark in, etc. Keyboard Maestro’s ability to respond to MIDI input doesn’t seem to be easily duplicated. AutoHotKey seems promising, but I haven’t been able to get the MIDI functions working yet.